1. Before you begin
- Read the manual thoroughly: understand all safety warnings and operational instructions.
2. Safety precautions
General power tool safety
- Keep the work area clean and well-lit.
- Wear protective gear: eye protection, ear protection, dust mask.
- Maintain balance and avoid loose clothing, loose hair or jewelry.
- Make sure the workpiece is stable and secure.
- Avoid operating in explosive atmospheres.
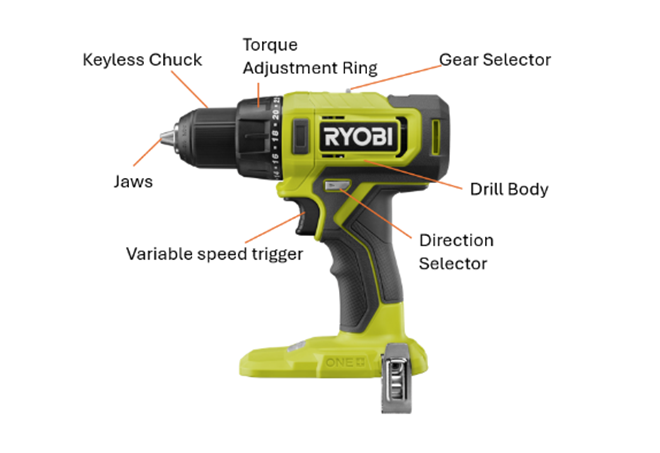
3. Understanding a drill/hammer drill
- Ensure that the 18V ONE+ battery is charged before usage.
Direction selection
- Use the directional selector (located above the trigger).
- Push the arrow facing forward in: to drive (screw in) and drill in the forward direction.
- Push the arrow facing backwards in: to unscrew screws/bolts and remove stuck drill bits.
- Ensure the drill is stopped before changing directions to prevent damage/injury.
Speed settings
- Use the gear selector (on top of the drill):
- Position 1 (low speed): for driving screws or drilling with control and higher torque.
- Position 2 (high speed): for fast drilling in wood or metal.
Torque settings
- Rotate the torque adjustment ring near the chuck:
- Lower numbers: less torque – for small screws or soft materials.
- Higher numbers: more torque – for larger screws or harder materials.
- Drill icon: maximum torque for drilling.
- Hammer icon: hammer drill only – drilling into masonry.
4. To insert a bit
a. Ensure safety first
- Disconnect the battery pack before inserting or removing any drill or driver bit.
b. Identify the keyless chuck
- Ryobi 18V ONE+ drills feature a keyless chuck, which allows for quick and easy bit changes without tools.
c. Open the chuck
- Hold the drill body securely with one hand.
- With your other hand, rotate the keyless chuck anti-clockwise (to the left) to open the jaws wide enough to insert the bit.
d. Insert the drill bit
- Insert the drill bit into the centre of the chuck, ensuring the cutting/driving end is pointing out.
- Ensure it is straight and centred, and at least 15 mm (more if possible ) into the jaws of the chuck. Note: When inserting a drill bit do not insert the cutting tread into the jaws
e. Tighten the chuck
- While still holding the drill body, rotate the chuck clockwise (to the right) to tighten the jaws around the bit.
- Make sure the bit is securely gripped and does not wobble.
- Do not over-tighten the chuck.
f. Test the bit
- Reconnect the battery pack.
- Grip the drill by the handle, ensuring your other hand is clear of the drill bit.
- Gently squeeze the trigger to ensure the bit spins correctly.
5. Removing a bit
a. Ensure safety first
- Disconnect the battery pack before inserting or removing any drill or driver bit.
- If the drill bit was just used, it may be hot, so a cooling period may be required.
b. Identify the keyless chuck
- Ryobi 18V ONE+ drills feature a keyless chuck, which allows for quick and easy bit changes without tools.
c. Open the chuck
- Hold the drill body securely with one hand.
- With your other hand, rotate the keyless chuck anti-clockwise (to the left) to open the jaws wide enough to release the drill bit.
d. Remove the drill bit
- Drill bits may be sharp, so handle with care.
- While still holding the drill body, remove the drill bit from the chuck.
6. Removing/driving a screw or bolt
a. Prepare the tool
- Ensure the battery is charged and properly inserted into the drill driver.
- Check the bit: use a screwdriver bit that matches the screw head (e.g. Phillips, flathead).
- Insert the bit into the keyless chuck and tighten it securely by hand.
b. Set the direction
- Locate the direction of rotation selector above the trigger.
- Push it to the reverse position (marked with an arrow pointing away from the chuck).
c. Adjust speed and torque
- Rotate the torque adjustment ring to a medium or high torque setting to ensure enough force to loosen the screw.
d. Remove the screw
- Gently squeeze the variable speed trigger to start the drill.
- Apply steady pressure in line with the screw.
- Once the screw loosens, reduce speed and remove it completely.
- Release the trigger when the screw is removed.
e. Driving a screw
- Push the direction selector to the forward position (arrow pointing towards the chuck).
- Align the screw with the driver bit.
- Gently squeeze the trigger to start the drill.
- Apply steady pressure in line with the screw.
- Once the screw tightens, reduce speed.
- Release the trigger when the screw is inserted.
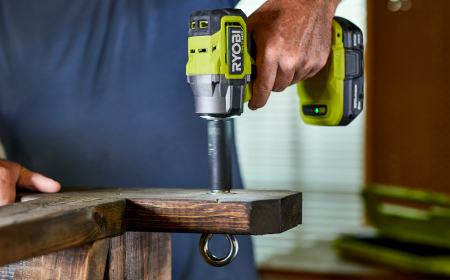
7. Drilling a hole
a. Prepare the drill
- Ensure the battery is removed before inserting any accessories.
- Select the correct drill bit for the material (wood, metal, or plastic).
- Insert the bit into the keyless chuck:
- Rotate the chuck anti-clockwise to open.
- Insert the bit fully and tighten clockwise until secure.
b. Set the drill mode
- Adjust the torque ring to the drill icon (this bypasses the clutch for full torque).
- Set the gear selector:
- Position 1 (0–450 rpm) for control and precision.
- Position 2 (0–1,700 rpm) for faster drilling in softer materials.
c. Set the direction
- Use the direction selector switch:
- Push the arrow facing towards the drill bit for forward (drilling).
- Ensure the switch clicks into place.
d. Secure the workpiece
- Clamp the material to prevent movement.
- Mark the drilling point with a pencil or centre punch.
e. Begin drilling
- Hold the drill with both hands (one on the body).
- Place the bit tip on the mark and ensure it is perpendicular to the surface.
- Start at low speed by gently pressing the trigger.
- Increase pressure and speed gradually as the bit begins to cut.
- Apply pressure in line with the bit—do not force it.
f. Monitor and finish
- Stop if the bit stalls—this could cause kickback.
- Withdraw the bit slowly once the hole is complete.
- Let the bit cool before touching or changing it.
g. After drilling
- Remove the bit and battery if switching tasks or storing the tool.
- Clean the drill and store it in a dry, safe place.
8. Storage
- Remove the drill bit and battery before storing tool.
- Store in cool and dry location.
RDD18C1, RDD18, RDD18C, RPD18C, RPD18X, RPD18, RPD18C1, RPD18X1, R18DR