SEARCH
Enter keywords, product name, or question
How to Change a Blade on a Mitre Saw
Safety First
- Disconnect the battery/disconnect the power before making any adjustments.
- Wear eye protection and gloves to avoid injury.
Step-by-Step Instructions
- Loosen the blade bolt cover screw
- Loosen (but do not remove) the screw on the blade bolt cover so you can access the blade bolt.
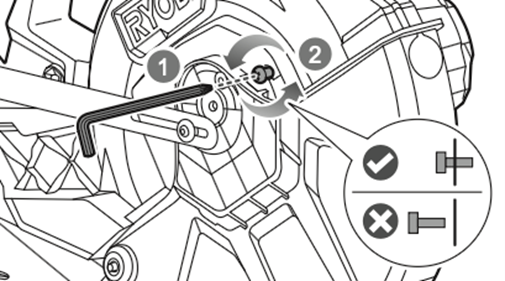
- Loosen (but do not remove) the screw on the blade bolt cover so you can access the blade bolt.
- Move the lower blade guard out of the way
- Swing the guard upward and hold it clear of the blade area.
- Keep fingers away from the blade at all times.
- Engage the spindle lock
- Press and hold the spindle lock button to stop the spindle from turning.
- Press and hold the spindle lock button to stop the spindle from turning.
- Loosen the blade bolt
- Use the Allen key supplied with the saw to turn the blade bolt clockwise while holding the spindle lock.
- Remove the outer flange.
- Remove the old blade
- Carefully slide the blade off the spindle.
- Note: The inner flange must remain on the spindle.
- Fit the new blade
- Ensure the rotation direction on the blade matches the arrow on the blade guard.
- Place the blade onto the spindle against the inner flange.
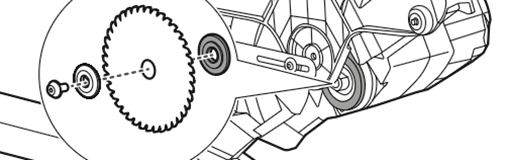
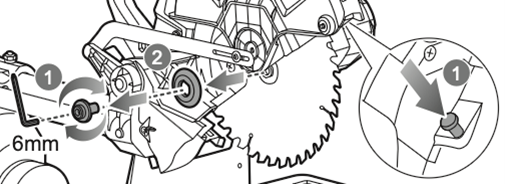
- Replace the outer flange and tighten the bolt
- Position the outer flange with its flat side facing the blade.
- Tighten the blade bolt anti-clockwise using the Allen key while holding the spindle lock.
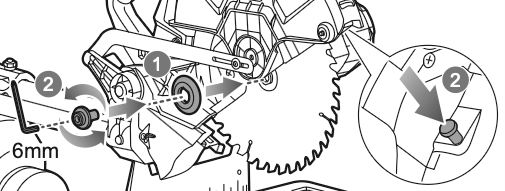
- Lower the blade guard and secure the cover
- Ensure the guard moves freely and automatically covers the blade.
- Tighten the blade bolt cover screw.
Final Checks
- Confirm the blade is secure and spins freely without wobble.
- Reconnect the power only when you are ready to cut.
RMS254DB, RMS254DB-K, RMS305DB, R18MS254X